Getting started with photobooks
December 2021
We recently offered a class, Getting started with photo books, and it proved very popular. So we thought we would, as part of the launch of Libraries SA new Being Digital program, share with you some resources you could use if you missed the class.
Reboot is Unley Libraries Being Digital program. We offer classes, workshops and one-on-one assistance with digital devices and programs across a range of skill levels.
What is a photobook?
A photo book is a personally designed collection of photos. Basically a digitally printed version of a photo album.
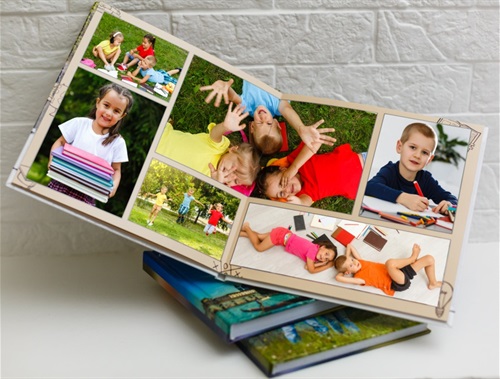
Photo books make beautiful gifts and are a fantastic way to bring your memories to life.
Some of the main reasons people create a photo book:
- Travel
- Wedding
- Family
- Baby
- As a gift
What you will need to create a Photo book
To create a photo book, you will need:
- to know how to use your digital device in general
- basic navigation and internet skills, including how to launch an app or web browser and upload/download files/photos.
- an email address if you wish to create an account to use an online photo book service
- digital photos
- there is a cost to purchase a final product from all these services.
Online photo services & apps
It can be valuable spending time playing around with different photo book services to find out how they work, ease of use, and what types of unique features they may offer before you decide on one to use.
Below are just some of the photo book online services and apps:
- Snapfish - Probably one of the best-known photo book services, Snapfish has been in the image business for the past two decades.
- Shutterfly - Shutterfly is one of the biggest names in on-line photo printing, with millions of users storing and printing their pictures on the site.
- BigW - BIG W Photos offers an easy way to turn your photos into a wide variety of different products. If you would like to try using the website before creating an account, you can do so by logging in as a guest. As a guest you will be able to upload photos and create projects online but to place an order you will need to create an account.
- Kmart – Kmart Photos offers Click and Collect of your Photo Book next day service for basic Photo Books or Delivery to your home for the more Premium Photo Books.
- Officeworks - Officeworks provides an online photo book maker that allows you to create a personalised photo album in a snap.
- Mixbook - Mixbook combines unique designs with a powerful editor, allowing you to create one-of-a-kind photo books that truly reflect your personal style. Mixbook is shipped from USA
- Picaboo – Picaboo’s software is easy to use, with features such as backgrounds and clip art option easily located to help achieve the desired look for your photo book.
- Canva - Making a photo book is easier than ever with Canva's tools and templates. Canva has a large range of templates depending on which photo book size you choose. Each template has a different design to fit the genre that best suits your book. Canva also offers a bunch of free stock images, if you need a few extra pages in your photo book.
Before starting your photo book
Before starting your photo book it is worthwhile making a rough plan. Having a plan is not necessary but will help you save time when you start to create your photo book.
Things to think about:
- Budget - the cost of your photo book will depend on several factors such as size, style, number of pages, and other extras you may add.
- Who is the photo book for?
- What is the photo book about?
- Do you have a time limit?
- What style would you like?
- What order you want the photos to be in (chronologically or random)
- How many photos do you want or need?
- Whether you are going to include text or if you would like to add captions to your photos.
- Will you be adding extras like diary entries or maps or other scanned documentation like brochures, invitations, guest lists etc.
Photo quality
- Photos loaded up to social media sites like Facebook have often had their quality lowered in order to display them on the web. It is not advisable to use these photos. Instead find the original photo files from the camera. A good indicator of quality is photo file size - the bigger the better.
- Don't over-enlarge pictures and be aware that low-quality photos, or photos that have been heavily cropped or zoomed, may not look sharp when printed. Blowing up pictures can reduce their quality.
- It is best to edit pictures using separate photo editing software rather than relying on the limited editing features in the photo book software.
- If you have doubts about any photos, it is best to not use them.
Resources from the providers
Here are a number of resources on how to create a photo book using some of the services listed above. As mentioned earlier, it can be valuable to experiment with different providers to work out what works best for you.
This is a good example of what kinds of photobooks are available, in this case from Picaboo, but each provider has their own array of types. Those with video accounts often have demonstrations like this.
Creating your photo book
Each provider has its own quirks, but all have the same basic options.
Once you have decided what your photo book is about, chosen your photos, and have a rough idea of the order your photos will go in.
Now for the fun bit!
- Choose which photo book service you would like to use.
- Select type of photo book you want to create (example; size, orientations, hard or soft cover, design).
- Most things about your photo book you can change and edit along the way but the one thing that is important to make a decision about at the beginning is the shape and size of photo book.
- These decisions are important to make at the start and stick with, or otherwise the designs you do may not be able to be modified to suit a new shape, and you may need to start from scratch.
- All books have a minimum page number of 20 and you can add pages as you go, so you don’t need to have worked out how many pages you need before you start. The more pages you add, the higher the cost of the book.
- Before you can make a photo book, you will need to upload your photos. Uploading photos can usually be done a number of ways.
- Most online photo services allow you to get your photos from multiple sources like an external drive, your PC, cloud services, or even Facebook and Instagram.
- Some of the terms for uploading used: ‘Drag and drop’, ‘browse files’, ‘add photos’, ‘get photos’.
- If adding from ‘Google Photos’, or ‘Facebook’ or ‘Instagram’, you will need to allow permission for the photo service to access these accounts.
- It can take a little while to upload multiple files.
- If you choose the autofill function your book will be created for you but you then have the option to make changes.
- Virtually all of the photo book service websites offer you the opportunity to generate a preview of your photo book so that you can inspect it closely before making the purchase.
Adding photos to your project
- The first thing you need to do to start your book is to add your photos to this project. This is where we get the photos you added to your chosen online photo service, and add them to your photobook project.
- You do not have to use all the photos you add in your photobook so if you haven’t made final decisions on what goes in, it doesn’t matter. This is just so we can access these photos for this specific project.
- You can add photos to your photo book project at any time, so you don’t have to worry about doing it all at once if you forget one.
Page layouts
- The next step is to design the layout of your book. You do this by selecting from a number of different templates.
- You can change the layout to something different even if you have photos already in your design, the photos will automatically move to the new layout too.
- If you wish to change your photo to another, simply click and drag a new one over to the same spot on the template and the photo will be replaced with the new one.
- When you have used a photo in your book, most online services will highlight the photo in some way so you know it has been used.
Themes and embellishments
- You can add design themes and backgrounds to your photobook, too. Using the designs menu means you can choose a variety of backgrounds to use across the whole book.
- You can also customise each page layout to your liking and feature more or less photos per page.
- Backgrounds are more separate so you can choose different ones for individual pages. It is best to have a play with these and see how you like them.
- If you have added a background and want to get rid of it, just change the colour back to the default of white.
- Embellishments are another option which are like pictures/cartoons and icons that you can add to your book for extra character.
Moving photos and pages
- To replace your photo with another photo, all you need to do is click and drag the new photo into its place in the template.
- However, you can also edit the photos like rotate them, move them, crop them or swap them into another template space. To do any of these options, just click on the photo and you will see the editing options appear.
- These are only very basic photo editing options. If you wish to do major editing of your photos, it is recommended to do it in a separate photo editing software before you upload your photos.
- If you get to the end of your book and you are not finished, you can add pages. Once you do this, the price of your book will increase, too.
- You can also add pages anywhere in your book too.
- If you want to change the order of some pages, you can usually click and drag them to where you want them to go.
Text
- Some photo templates will have captions for text already incorporated, which you can use if you wish. If you do not add any text in those boxes, the photo will print normally. You will not see an ‘Add text’ printed in your book!
- If you wish to add more text boxes, either to templates that don’t already have them, or you wish to add a whole page of text, for example, you can also do this using the text option.
- You can usually move the text box around by clicking and dragging it.
Print preview
- Once you are happy with your book, you can check exactly what it will look like printed (eg with empty text boxes removed, etc) by clicking on the ‘Review and buy’ button.
- Once you are ready to checkout, double-check your purchase and be careful to read all information before you confirm and pay for your purchase.
- Don’t worry, you don’t have to buy it at this point, it will just give you the opportunity to do a thorough, final edit.
- It is important to fully read everything that is on your checkout screen and if there is an optional add-on that you don’t want – ignore them, or untick those options!
Paying for your book
- Your book will usually stay in your account so you can order at a later time (if at all) or when there is a good promotional deal to help you save money.
- Most websites will give you at least a couple of payment methods to choose from. The most common way to pay for items is with a credit card. Websites will usually display logos of the main credit card providers, such as Visa and Mastercard.
- Another option that is very popular is PayPal. PayPal is an online payment service that runs as a third party to the website you may be shopping from.
- Bear in mind, it can take up to a few weeks to print and ship to you so if it is for a special occasion, do allow yourself enough time.
- And a final reminder – as with all online transactions, it is recommended to do this via a secure internet connection.
Staying safe online
As part of Being Digital, Reboot offers classes on staying safe online. Keep an eye on our Reboot events page or subscribe to our Reboot Alert eNews to be notified when the next Reboot brochure is available.
Libraries SA Being Digital website also offers resources on online safety. This includes online shopping and how to shop safely.
We hope this helps you with the process of creating a photo book. Remember that our one-on-one Tech help sessions are available to assist you, should you have any trouble with the above.
Disclaimer: Links to external sites do not constitute an endorsement or approval by The City of Unley.
Click here to view form.